Saturday, February 18, 2012

Recognizing Anger In Our Bodies & Controlling Emotions


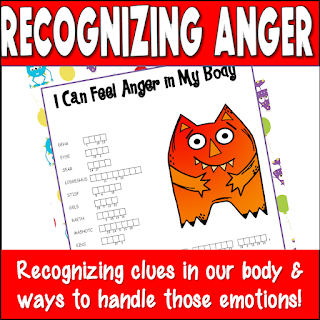
Hey there! Today I wanted to share about one of my favorite small group Anger Management activities. Our bodies give us clues that we are getting angry and if we can tap into those clues ahead of time, we can be proactive in handling those emotions. 

We start with a fun word puzzle activity called "I Can Feel Anger in my Body Word Puzzle" and then make Anger Journal Books. These activities help students identify their own body’s reactions and understand their response to anger.  


Let’s look into the benefits of these activities and how they can help kids manage their anger better.

Recognizing Body Clues:

So, the first thing we did was this awesome word puzzle. We unscrambled words to figure out different body parts and how they react when someone is getting angry. The kids came up with all sorts of cool stuff! They said their heart beats fast, they feel butterflies in their stomach, their hair stands up, their fists get all tight, their face gets hot, their ears stop working, and their breathing gets heavy. It was amazing to see them share their experiences, and I drew it all on the Smart Board to make it more fun!

Benefits of Recognizing Body Clues:

Recognizing the clues from our bodies when we're angry has some pretty neat benefits for kids. First off, it helps them become more self-aware. By knowing what their bodies are telling them, they can understand their emotions better. It also helps them stop anger from getting out of control. When they recognize those signs early on, they can take a step back and use some calming strategies to deal with their anger in a healthier way.

Creating Anger Journal Books:

Now that we know what clues our bodies give us and the way we react, we make these awesome Anger Journal Books using paper bags. We cut the edges of three paper bags and fold them in half to make pockets. It was super simple! On the front cover, we glued on the statements we talked about in our group.

Inside the journal, the kids got to decorate the pages with drawings of the body parts that give them clues when they're getting angry. We put a small picture of a body part in each pocket, and on the back, they completed a statement about when they felt angry. They wrote things like, "Today I felt angry. I knew I was angry because my body gave me clues. I could feel ______________. I handled my angry feelings this way ___________." It was like having their own secret diary!


Benefits of Anger Journal Books:

These Anger Journals are really something special. They give the kids a way to track their anger and how they handle it over time. By writing and drawing about their anger, they can understand it better and learn from their experiences. It's like having a little window into their emotions. Plus, it helps them become more self-aware and emotionally intelligent, which is super important!

Here are some additional activities that could be done... 


Mindful Breathing: Teach students a simple breathing exercise to help them calm down when they feel angry. Encourage them to take slow, deep breaths, counting to four as they inhale and exhale. They can practice this technique whenever they start feeling the physical clues of anger.

Role-playing Scenarios: Create hypothetical situations that might trigger anger in students and have them act out different ways of responding. This activity allows them to practice using their anger management strategies in a safe and controlled environment.

Emotion Charades: Write down various emotions, including anger, on small pieces of paper. Have students take turns picking a paper and acting out the emotion without using any words. The rest of the group can guess which emotion is being portrayed. This activity helps students recognize and understand different emotions, including anger, both in themselves and others.

Emotion Collage: Provide magazines, scissors, glue sticks, and large sheets of paper. Ask students to cut out images or words that represent different emotions, including anger. Then, they can create collages by arranging and gluing these images onto the paper. This activity helps students explore and express their emotions visually.

Worry Dolls: Have students make their own worry dolls using pipe cleaners, yarn, and small fabric scraps. As they create these dolls, explain that they can share their worries and angry feelings with the dolls before going to sleep. This craft encourages students to externalize their emotions and feel a sense of relief.

Calming Sensory Bottles: Provide empty plastic bottles, water, glitter, and small objects like beads or sequins. Students can fill the bottles with water, add glitter and small objects, and seal them tightly. These sensory bottles can serve as calming tools, as students watch the objects swirl and settle, helping them relax and refocus their thoughts when feeling angry.

Anger Thermometer: Create a large thermometer template on a poster board or chart paper. Have students decorate and label it with different anger levels, such as "cool," "warm," "hot," and "exploding." Encourage them to draw or write about specific strategies or activities they can use to bring their anger levels down. This visual representation helps students monitor and regulate their anger intensity.

Feelings Masks: Provide paper plates, craft supplies like markers, paints, and yarn, and elastic bands. Students can decorate the masks to represent different emotions, including anger. They can then use these masks in role-playing activities to express and manage their emotions effectively.


Teaching elementary students about anger management is such a valuable skill! By recognizing the clues their bodies give them and creating Anger Journal Books, kids can learn to handle their anger in a healthier way. It's all about understanding themselves better and finding effective strategies to manage their emotions. These activities are a great step toward helping them become more self-aware, regulate their emotions, and handle challenging situations like pros!


Ready to Use Resource


Shop here for this resource:


Looking for more lessons about handling emotions? Check these out!


Thursday, February 16, 2012

Empower Students to be a Victim: Stand Up to Bullies & Stick It to Bullying


Hey there, teachers and parents! Today, we’re going to Stick it to Bullying! As adults who don’t want to see our kids bullied, it's our duty to equip our children with the knowledge and skills they need to tackle this issue head-on. We'll explore what bullying really is, the different ways it can show up, and most importantly, what our students can do if they find themselves or others in the line of fire. 

Understanding Bullying:

Okay, let's break it down. Bullying happens when someone repeatedly picks on or hurts another person, and there's an IMBALANCE OF POWER. It's not just a one-time thing; it's a PATTERN of behavior that can take different forms. There are many types of bullying: however, not to overwhelm our young students, I focus on 3 main types seen in our schools. You got physical bullying, which is all about being physically aggressive like hitting or pushing. Then there's verbal bullying, where mean words and insults are flung around. Last but not least, we have emotional bullying, where others use exclusion, manipulation, or even cyberbullying through social media and texts to cause harm. 

Empowering Students:

Now that we know what bullying is, let's talk about how we can empower our student superstars to take action against it. Here are some steps they can take:

Spotting Bullying: We want our students to be able to recognize bullying when they see it. So let's chat with them about different scenarios and examples to help them understand the difference between harmless teasing and harmful behavior.

Speak Up and Reach Out: We want our students to know that they don't have to face bullying alone. Encourage them to reach out to trusted adults like teachers, parents, or school counselors. Ask them who is YOUR trusted adult? Remind them that support is just a conversation away!!!

Be an Upstander, Not a Bystander: We all have the power to make a difference. Encourage our students to stand up against bullying when they witness it. They can directly intervene or find an adult who can help. Practice and rehearse common situations they might find themselves in. Let's show them that their actions can change lives!

An Activity that Sticks: "Stick it to Bullies" Bumper Stickers

Share the Purpose: Talk to the students about why it's so important to take a stand against bullying. Get them thinking about powerful messages they'd like to share. 

Get Artsy: Gather up some art supplies like paper, markers, colored pencils, and stickers. Let the students unleash their creativity and design bumper stickers that catch the eye and spread awareness.

Show and Tell: Give everyone a chance to share their designs with the class. Encourage them to explain the meaning behind their creations and foster empathy and understanding. Then, let them proudly display their bumper stickers in the classroom or school hallways to spread the word.


Teaching our students about bullying and empowering them to make a difference is a game-changer. Remember, we're all in this together, and every student can make a difference. Let's create a culture of kindness, empathy, and respect that goes beyond the classroom walls. So, let's stand tall, ”Stick it to Bullies," and build a brighter future where bullying has no place. Together, we've got this!

Ready to Use Resource:


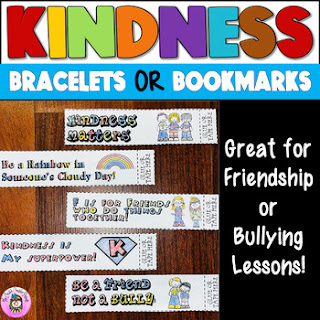
Kindness bracelets bookmarks, friendship, anti bullying

Get ready to unleash your inner superhero and safeguard the digital world for our young champions! Shop here for this resource:


Looking for more lessons on Personal Safety? Check out this one:


Monday, January 30, 2012

Exploring the Therapeutic Power of Dyed Rice for Relaxing and Coping


Exploring the Soothing Splendor of Dyed Rice

Hey everyone, guess what? Over the weekend, I had the most amazing idea! I decided to dye rice using Kool-Aid, and let me tell you, the results were mind-blowing! 🌈✨

My initial plan was to create a colorful rice tray as a fun alternative to a sand tray. But then it hit me, why not use the dyed rice to make feelings jars with my students? Each color could represent a different feeling, and they could visually represent how much of each feeling they have in a sealed jar. It's like turning a common issue into a beautiful work of art that's meaningful to the students. How awesome is that?

And let me tell you, the process was super simple! All I did was put about 1 cup of rice in a ziplock bag, mix 2 tablespoons of hot water with Kool-Aid powder, and pour it into the bag of rice. Then, I squished, squashed, and mashed it until the rice was fully covered in vibrant colors. After spreading the rice out on wax paper to dry for about 15 minutes (although I left it out longer just to be safe), I ended up with bags of different colored rice—cherry red, grape purple, watermelon pink, orangy orange, and even some yellow, green, and blue using food coloring. Talk about a rainbow of possibilities! 🌈😍


I was beyond excited to bring my dyed rice to school and see how I could use it. And wouldn't you know it, the perfect opportunity presented itself sooner than expected! While working with a student on anger management and finding alternatives to destructive behaviors, she noticed my colorful rice and asked about it. That's when inspiration struck! We decided to make a Relax Jar using a baby jar filled with blue rice and beads with the letters R-E-L-A-X and some sequins. The idea was that when she gets angry, she can turn the jar and search for the letter beads, giving her something positive to focus on and hopefully calming her down. How amazing is that? 🌟 Since then, I have switched to plastic jars. I just recycle my old vitamin jars after being thoroughly washed and sanitized!


Update: Can you believe it? I'm still in love with this colorful dyed rice. 🌈✨ ! It's been years since I started using it with students, and it's still one of my favorite strategies to use with students. The best part? If you store the rice in an airtight container, it lasts forever! Personally, I love reusing empty liquid coffee-mate containers to keep my big batches in—they make for perfect storage with their clear containers and convenient pouring spouts. 

Since my first post, I've been exploring different ways to use this colorful dyed rice. 🌈✨ creation with my students, and let me tell you, the possibilities are endless! Not only is dyed rice visually stunning, but it also has a wide range of benefits for students. Let’s check out some amazing uses and advantages together!

1️⃣ Calming Sensory Tool: One of the most remarkable aspects of dyed rice is its calming effect. The gentle texture and soothing colors provide a sensory experience that can help students relax and find peace in moments of stress or overwhelm. Just running their fingers through the soft grains can bring a sense of comfort and tranquility. It's like holding a jar of serenity in their hands. πŸŒΎπŸ’†‍♂️

2️⃣ Anger Management Aid: Dyed rice can be a powerful tool in anger management strategies. When students feel their emotions escalating, they can turn to the rice as a healthy outlet for their anger. By swirling and shifting the rice in a container, they can release tension and redirect their focus. It's a tangible way for them to physically and mentally engage with their emotions, allowing them to cool down and regain control. πŸ’¨πŸŒͺ️

3️⃣ Coping Skill Development: The process of working with dyed rice provides an opportunity for students to develop valuable coping skills. As they create art or engage in sensory play with the rice, they learn to channel their emotions, express themselves creatively, and find positive ways to manage their feelings. It's a hands-on approach that encourages self-reflection and empowers them to navigate challenging situations with resilience and grace. πŸ–Œ️🧠

4️⃣ Artistic Expression: Let's not forget the artistic possibilities that dyed rice offers! Students can use the colorful grains to create beautiful and vibrant works of art. They can design collages, mosaics, or even use the rice as a medium for sensory painting. The versatility of dyed rice allows students to explore their creativity and express themselves in unique and captivating ways. It's like having a rainbow at their fingertips! 🎨🌈


But wait, there's more! Dyed rice has additional benefits for students that extend beyond its calming and artistic qualities. It also promotes:

🌟 Fine Motor Skills Development: Manipulating and playing with the rice enhances students' fine motor skills, such as pinching, grasping, and pouring. These small movements strengthen their hand-eye coordination and dexterity, preparing them for tasks that require precise control and coordination.

🌟 Focus and Concentration: Engaging with the rice demands attention and concentration. Whether it's exploring its textures, carefully arranging it, or working on art projects, students learn to stay present and fully immerse themselves in the task at hand. This cultivates a sense of mindfulness and helps develop their ability to sustain focus.

🌟 Social Interaction and Collaboration: Dyed rice can be an excellent tool for fostering social interaction and collaboration among students. Whether they're sharing a sensory bin, collaborating on an art project, or engaging in a calming activity together, the rice becomes a catalyst for connection and camaraderie. It opens doors for communication, cooperation, and the building of meaningful relationships.

So there you have it, my friends! Dyed rice is not only visually stunning and captivating, but it also offers a myriad of benefits for students. From promoting calmness and anger management to developing coping skills and fostering artistic expression, the possibilities are truly endless. So grab your ziplock bags, choose your favorite colors, and let your imagination run wild! Together, let's create a world of colorful possibilities for our students. 🌈🌾

Share your own experiences with dyed rice and any additional uses you've discovered in the comments below. Let's keep the conversation going and inspire each other to make a difference in the lives of our students! πŸŒŸπŸ’™

Oh, and guess what? I just made another 14 pounds of dyed rice for the upcoming school year. Get ready for even more colorful adventures! πŸŽ‰πŸ’›

Here are some tips I've discovered along the way:

Use 1 pack of Kool-Aid per pound of rice.
I found that mixed berry (blue), strawberry kiwi (pink), green apple (green), lemonade with a few drops of yellow food coloring (yellow), grape (purple), orange (orange, obviously), and black cherry (red) worked great as flavors.
Only add a few spoonfuls of water to mix the powder, and then put the rice and Kool-Aid dye in a quart-size ziplock bag. Shake, shake, shake for about 30 seconds, and voila! Vibrant and aromatic rice ready for your creative adventures. Enjoy! πŸŒˆπŸ™Œ


#ColorfulCounseling #SensoryPlay #ArtTherapy #StudentWellbeing

Looking for more Coping Activities? Check these posts out!